技術本部 Sansan Engineering Unit Nayose グループでエンジニアをしている冨田です。業務では、Ruby on Rails(以降 Rails)を使って名寄せサービスを開発しています。
今回は、Rails などの Ruby コード内のイベント計測に使われる、Active Support Instrumentation について解説します。本 API を利用することで、アプリケーション内で発生するさまざまなイベントを計測し、パフォーマンス改善やデバッグなどの調査に役立てられます。直近 Nayose グループでは、問題調査のために、特定テーブルへの SQL とその呼び出し元をロギングする用途で使いました。
次のバージョンを対象としています。
- Rails 7.0.4
- Active Record 7.0.4
- Active Support 7.0.4
- Ruby 3.1.4
以下が本記事の目次になります。
- Active Support Instrumentation について
- Rails 内部のイベントを購読する
- 独自イベントを計測・購読する
- 落穂拾い
- Active Support Instrumentation の仕組み
- Active Support Subscriber について
- Rails 内部でのイベント計測・購読について
- まとめ
Active Support Instrumentation について
最初にどのような機能かを簡単に説明します。
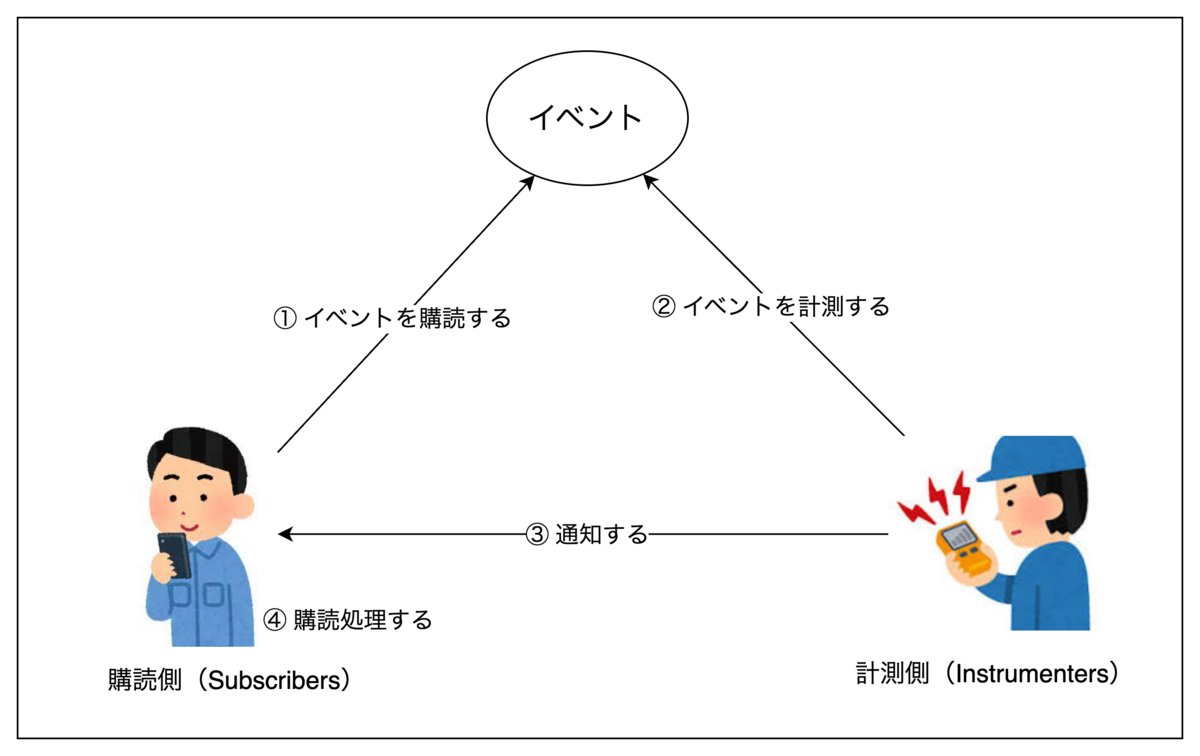
次の要素から構成されます。
- 計測側:イベントを計測し、イベントが起きたことを購読側に伝えます
- 購読側:計測側から通知を受け取り、計測情報を元に購読処理を行います
大まかな流れとしては、次の図になります。

実例を見た方がわかりやすいと思うので、さっそく試してみましょう。
Rails 内部のイベントを購読する
Rails 内部ではさまざまなイベントが計測されているので、最初からそれらの購読が行えます。イベントの購読には、ActiveSupport::Notifications.subscribe を利用します。
例えば、次のようにイベント購読することで、実行クエリに関する情報を確認できます。イベント購読は、イベント計測(今回の場合は Vehicle.last)される前に行っておきます。 具体的には、イベント名、イベントの開始/終了時刻、実行されたクエリを確認します。
ActiveSupport::Notifications.subscribe "sql.active_record" do |name, started, finished, unique_id, data|
  # 購読処理を書く
  puts "#{name} Received! (started: #{started}, finished: #{finished})"
  puts data[:sql]
end

# 検証用の Active Record モデル
Vehicle.last
=>
...(他SQL実行に関する情報も出力されているが省略)
sql.active_record Received! (started: 2024-02-03 22:46:07 -0800, finished: 2024-02-03 22:46:07 -0800)
SELECT `vehicles`.* FROM `vehicles` ORDER BY `vehicles`.`id` DESC LIMIT 1
...
subscribe メソッドの引数には、購読対象となるイベント名を設定します。Active Record のイベントの 1 つである sql.active_record を設定します。また、ブロックには計測情報が渡されるため、これらを使って購読処理を行えます。
- イベント名
- イベントの開始時刻
- イベントの終了時刻
- イベントを発火させた計測側のユニークID
- イベントのペイロード(計測側で別途設定した値)
引数を 1 個のみ受け取るブロックを渡した場合、上記引数の代わりとして ActiveSupport::Notifications::Event インスタンスが渡されるようになります。以降の説明ではこちらを利用します。
ActiveSupport::Notifications.subscribe "sql.active_record" do |event|
  puts "#{event.name} Received! (duration: #{event.duration} msec)"
  puts event.payload[:sql]
end

Vehicle.last
=>
...(他SQL実行に関する情報も出力されているが省略)
sql.active_record Received! (duration: 2.114999771118164 msec)
SELECT `vehicles`.* FROM `vehicles` ORDER BY `vehicles`.`id` DESC LIMIT 1
...
独自イベントを計測・購読する
アプリケーション内で独自のイベントを計測・購読できます。
インベント計測は、ActiveSupport::Notifications.instrument で行います。引数には、イベント名、購読側に連携したいハッシュ、計測対象のイベント処理を指定します。
ActiveSupport::Notifications.subscribe "my.custom.event" do |event|
  puts "duration: #{event.duration} msec, payload: #{event.payload}"
end

# イベント名は "my.custom.event"、購読側に {this: :data} が連携される
ActiveSupport::Notifications.instrument "my.custom.event", this: :data do
  # 計測対象のイベント処理を書く
  sleep 3
end
=>
duration: 3001.2370014190674 msec, payload: {:this=>:data}
計測情報が表示できていますね。
では、もう少し具体的な利用例で考えてみましょう。
例えば、商品を工場間で運ぶことを題材にしてみましょう。具体的には、商品ABを工場Aから工場Bに運び、逆に商品BAを工場Bから工場Aに運ぶことを考えます。商品を運ぶ際にいくつかルートがあり、どのルートになるかはそのタイミングでさまざまな要因から決まります。それぞれの商品を運ぶのに使ったルート、配送時間を確認したいとしましょう。

そこで、ActiveSupport::Notifications を使ってみましょう(他にも手段はありますが、利用例の紹介としてご理解ください 🙏)。
class FreightTransfer
  class << self
    def transport(freight:, from:, to:)
      deliver_route = Random.rand(100) # さまざまな要因によって決まることを仮定...

      ActiveSupport::Notifications.instrument "freight_transport.event", message: "transported_from_#{from}_to_#{to}", deliver_route: deliver_route do
        sleep 5 # 配送処理を仮定...
      end
    end
  end
end
result = []

ActiveSupport::Notifications.subscribe "freight_transport.event" do |event|
  result << {
    message: event.payload[:message],
    deliver_route: event.payload[:deliver_route],
    duration: "#{event.duration} msec"
  }
end

FreightTransfer.transport(freight: 'AB', from: 'A', to: 'B')
FreightTransfer.transport(freight: 'BA', from: 'B', to: 'A')

puts result
=>
{:message=>"transported_from_A_to_B", :deliver_route=>51, :duration=>"5001.178998947144 msec"}
{:message=>"transported_from_B_to_A", :deliver_route=>36, :duration=>"5000.464000701904 msec"}
簡単な例ですが、期待通りの情報が確認できました。
落穂拾い
その他の便利な機能について、簡単に説明しておきます。
正規表現によるイベント名の設定
購読イベントの指定には正規表現が使えます。 その場合、正規表現にマッチするイベントが購読対象になります。
ActiveSupport::Notifications.subscribe /custom/ do |event|
  puts event.payload
end

ActiveSupport::Notifications.instrument "my.custom1.event", this: :data1
ActiveSupport::Notifications.instrument "my.custom2.event", this: :data2
=>
{:this=>:data1}
{:this=>:data2}
一時的な購読
ActiveSupport::Notifications.subscribed を利用することで、計測側からの通知をブロック実行中に限定できます。購読処理はコールバックで指定し、ブロック実行後コールバックは自動的に購読解除されます。
callback = lambda {|event| puts event.payload }

ActiveSupport::Notifications.subscribed(callback, "my.custom.event") do
  ActiveSupport::Notifications.instrument "my.custom.event", this: 'executing block'
end

# このイベント計測は通知されない
ActiveSupport::Notifications.instrument "my.custom.event", this: 'not executing block'
=>
{:this=>"executing block"}
ただ、ドキュメントによると、パフォーマンスに悪影響があるかもしれないとのことなので、実際に使う際は要確認です。
WARNING: The instrumentation framework is designed for long-running subscribers, use this feature sparingly because it wipes some internal caches and that has a negative impact on performance.
エラー時の挙動
イベントの計測中にエラーが起きた時はどうなるのでしょうか。
その場合は、計測側から通知される情報(payload)に、エラーに関する情報が追加されます。具体的には、:exception キー に「エラークラスとメッセージ」、exception_object キー に「エラーオブジェクト」が追加されます。
これらの情報を使ってエラーハンドリングできますね。
ActiveSupport::Notifications.subscribe "my.custom.event" do |event|
  puts event.payload
end

ActiveSupport::Notifications.instrument "my.custom.event", this: :data do
  raise StandardError, 'an exception happened during that particular instrumentation.'
end
=>
{
  :this=>:data,
  :exception=>["StandardError", "an exception happened during that particular instrumentation."],
  :exception_object=>#<StandardError: an exception happened during that particular instrumentation.>
}
Active Support Instrumentation の仕組み
一通り機能について説明してきました。
これら機能は、どのような仕組みで実現されているのでしょうか。
全てを解説するのは難しいため、ここでは以下を実行したときに限定して確認してみます。
ActiveSupport::Notifications.subscribe "my.custom.event" do |event|
  puts "duration: #{event.duration} msec, payload: #{event.payload}"
end

ActiveSupport::Notifications.instrument "my.custom.event", this: :data do
  sleep 3
end
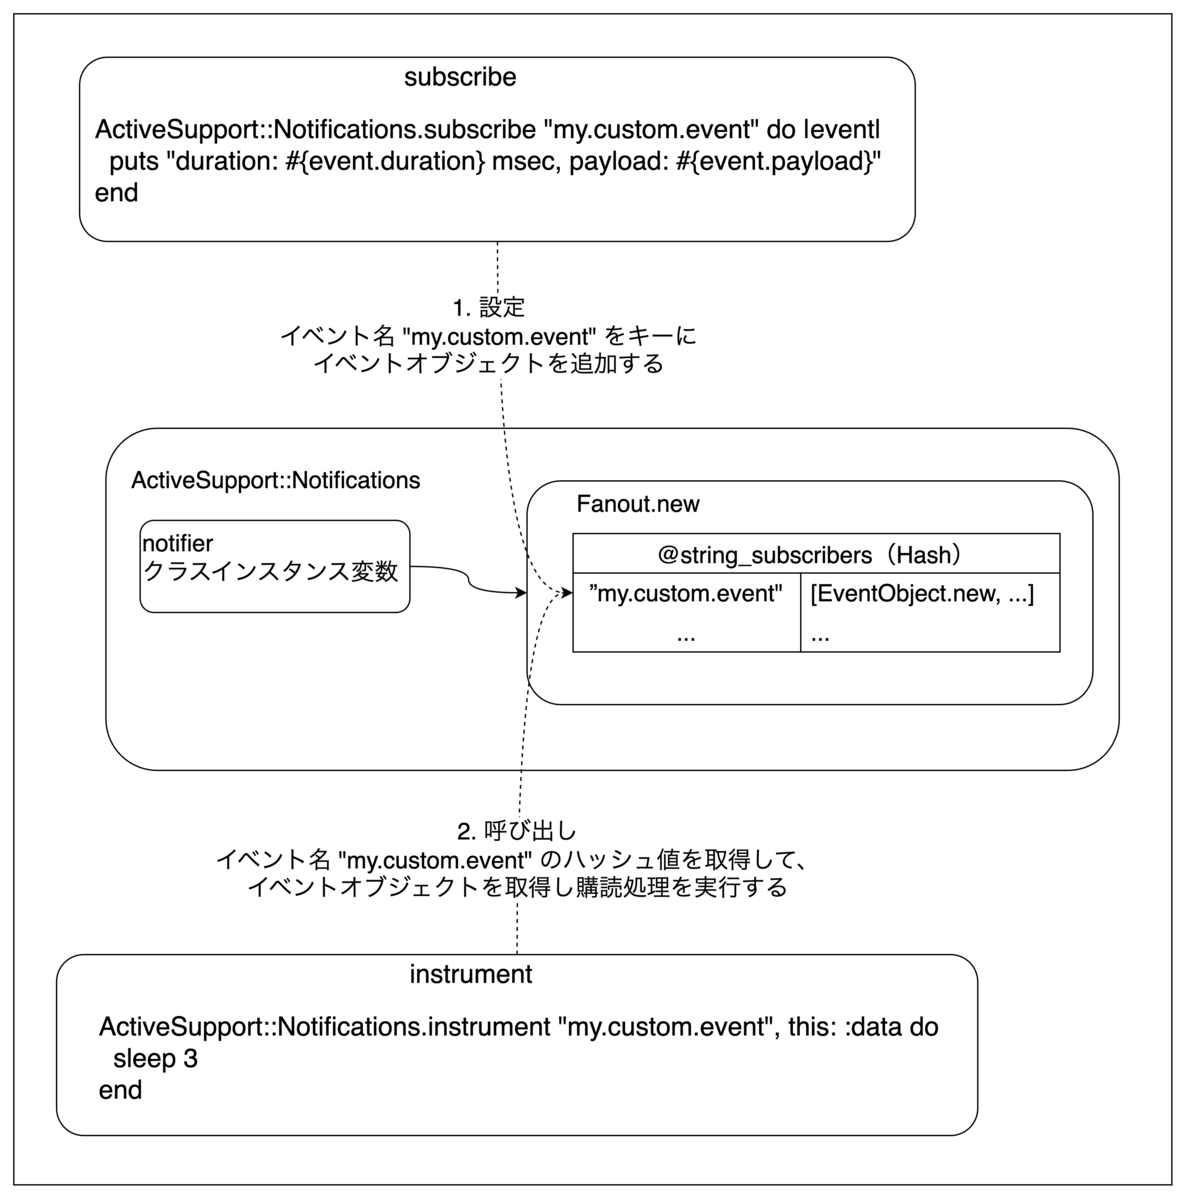
上記を実行した際の流れを図示してみました。 厳密には、他クラスやメソッドが出てきますが、わかりやすさ重視で省略しています。

キューの役割を果たす ActiveSupport::Notifications::Fanout インスタンスを経由して、イベントの計測・購読が行われています。Fanout インスタンスは、内部に購読設定を管理するハッシュを持っています。具体的には、イベント名をキーにして、購読設定を保持するオブジェクト(以降イベントオブジェクト)の配列が紐付きます。
上記実装において、各メソッドの処理内容を確認してみます。
イベント購読
subscribe では以下が行われています。
- イベントオブジェクトの 1 つである EventObject インスタンスを作成します(@delegate に購読処理を保持)
- @string_subscribers に、"my.custom.event" をキーにして上記インスタンスを追加します
具体的な処理箇所を次に示します。
# https://github.com/rails/rails/blob/v7.0.4/activesupport/lib/active_support/notifications/fanout.rb から抜粋

module ActiveSupport
  module Notifications
    ...
    class Fanout
      ...
      def subscribe(pattern = nil, callable = nil, monotonic: false, &block)
        subscriber = Subscribers.new(pattern, callable || block, monotonic)
        synchronize do
          case pattern
          when String
            @string_subscribers[pattern] << subscriber # ここで追加されます
            @listeners_for.delete(pattern)
          when NilClass, Regexp
            @other_subscribers << subscriber
            @listeners_for.clear
          else
            raise ArgumentError,  "pattern must be specified as a String, Regexp or empty"
          end
        end
        subscriber
      end
      ...
    end
    ...
  end
  ...
end
イベント計測
instrument では以下が行われています。
- @string_subscribers を "my.custom.event" で引いて、該当インスタンスを取得します
- 計測情報(イベントの開始・終了時刻など)を記録しつつ、イベント処理を実行します(今回は sleep 処理)
- 計測情報を踏まえて、該当インスタンスから購読処理を実行します(@delegate.call が呼ばれる)
具体的な処理箇所を次に示します。
# https://github.com/rails/rails/blob/v7.0.4/activesupport/lib/active_support/notifications/instrumenter.rb から抜粋

module ActiveSupport
  module Notifications
    ...
    class Instrumenter
      ...
      def instrument(name, payload = {})
        listeners_state = start name, payload
        begin
          yield payload if block_given? # 計測対象のイベント処理が実行されます
        rescue Exception => e
          payload[:exception] = [e.class.name, e.message]
          payload[:exception_object] = e
          raise e
        ensure
          finish_with_state listeners_state, name, payload # 購読処理が実行されます
        end
      end
      ...
    end
    ...
  end
  ...
end
補足
ちなみに、@string_subscribers のハッシュ値は配列になっており、複数のイベントオブジェクトを保持できるようになっています。なので、あるイベントを複数回購読できます。その場合は、購読設定した順番に通知が行われます。
実際に確認してみます。
ActiveSupport::Notifications.subscribe "my.custom.event" do |event|
  puts "subscribe_1: #{event.payload}"
end

ActiveSupport::Notifications.subscribe "my.custom.event" do |event|
  puts "subscribe_2: #{event.payload}"
end

ActiveSupport::Notifications.instrument "my.custom.event", this: :data
=>
subscribe_1: {:this=>:data}
subscribe_2: {:this=>:data}
購読設定した順番に実行されていますね。
また、今回は触れませんでしたが、スレッドセーフを考慮した実装がされているので、気になる人はコードを読むと発見があるかもしれません。
Active Support Subscriber について
これまで購読設定は ActiveSupport::Notifications.subscribe メソッドを呼んでいましたが、より便利な ActiveSupport::Subscriber が用意されています。
このクラスを継承したクラスを用意することで、イベント購読できます。継承先のクラスで、ActiveSupport::Subscriber.attach_to を呼び出し、public メソッドを定義することで、 [public メソッド名].[attach_to の引数名] イベントが購読されます。
実際に使い方を見ていきましょう。
class CustomSubscriber < ActiveSupport::Subscriber
  # CustomSubscriber クラス内ではなく、別途呼び出してもいい
  # CustomSubscriber.attach_to :custom
  attach_to :custom

  def event(event)
    puts "event message: #{event.payload[:message]}"
  end

  def event_2(event)
    puts "event_2 message: #{event.payload[:message]}"
  end
end

ActiveSupport::Notifications.instrument('event.custom', message: "hogehoge")
ActiveSupport::Notifications.instrument('event_2.custom', message: "fugafuga")
=>
event message: hogehoge
event_2 message: fugafuga
購読設定がまとまっていてわかりやすいですね。
Rails 内部でのイベント計測・購読について
冒頭で Active Support Instrumentation は Rails 内部でも使われていると書きました。
ここまでの内容を踏まえて、どのように使われているのか確認してみましょう。
例えば、Active Record でクエリ実行した際に log/development.log へ出力されるログについて、流れを追ってみます。
  Vehicle Load (2.6ms)  SELECT `vehicles`.* FROM `vehicles` ORDER BY `vehicles`.`id` DESC LIMIT 1
  ...
イベント購読
Active Support では、ログ出力用の Subscriber として、ActiveSupport::LogSubscriberが用意されています。ActiveSupport::Subscriber を継承しているため、上述の機能を使えます。
実際に、ログ出力を行っているのは、上記クラスを継承した専用クラスになります。例えば、Active Record であれば、ActiveRecord::LogSubscriberが該当します。他モジュールにもそれぞれ専用クラスが用意されています(例. ActionController::LogSubscriber, ActionView::LogSubscriber, ...)。
購読設定の流れは ActiveSupport::Subscriber と同じになります。
ActiveRecord::LogSubscriber には、ログ出力を行う sql メソッドが定義されており、attach_to :active_record を実行することで、 sql.active_record のイベントが購読されます。
具体的な処理箇所を次に示します。
# https://github.com/rails/rails/blob/v7.0.4/activerecord/lib/active_record/log_subscriber.rb から抜粋

module ActiveRecord
  class LogSubscriber < ActiveSupport::LogSubscriber
    ...
    def sql(event)
      # ログ出力...
    end
    ...
  end
end

ActiveRecord::LogSubscriber.attach_to :active_record
イベント計測
その上で Vehicle.last のように実行すると、その処理先で sql.active_record のイベント計測が行われ、購読処理である sql メソッドが呼ばれる、という流れになります。
具体的な処理箇所を次に示します。
# https://github.com/rails/rails/blob/v7.0.4/activerecord/lib/active_record/connection_adapters/abstract_adapter.rb から抜粋

module ActiveRecord
  module ConnectionAdapters # :nodoc:
    class AbstractAdapter
      ...
      def log(sql, name = "SQL", binds = [], type_casted_binds = [], statement_name = nil, async: false, &block) # :doc:
        @instrumenter.instrument(
          "sql.active_record",
          sql:               sql,
          name:              name,
          binds:             binds,
          type_casted_binds: type_casted_binds,
          statement_name:    statement_name,
          async:             async,
          connection:        self) do
          @lock.synchronize(&block)
        rescue => e
          raise translate_exception_class(e, sql, binds)
        end
      end
      ...
    end
  end
end
普段目にするログ出力は、このような仕組みで行われていたんですね。
まとめ
Active Support Instrumentation の使い方から始めて、簡単に内部の仕組み、Rails 内部での使われ方について説明しました。 基本的な使い方を理解できたら、計測したい内容を設定してみましょう。 本記事が Active Support Instrumentation を利用する際の参考になったら幸いです。