
こんにちは、今年4月にSansanにジョインしたジャン(a.k.a jc)です。研究開発部Architectグループにてデータエンジニアとしてデータ基盤の開発・保守を担当しています。 今回は【R&D DevOps通信】連載の3回目、データ基盤におけるGitHub Actionsを使ったTerraformとCloud ComposerのCI/CDを紹介します。 GitHub Actionsについての取り組みは同じグループの島が過去の連載で紹介しているので、ぜひご覧ください。
背景
ソフトウェア開発をより正確に効率よく行うための手法として、CI/CD (Continuous Integration / Continuous Delivery / Continuous Deployment)は現代DevOpsのバックボーンと言っても過言ではないでしょう。データ基盤も例外なくCI/CDを導入すべきだと我々は考えています。 弊社研究開発部のデータ基盤はクラウドサービスAWSとGCP両方を採用しており、ワークフローはGCPが提供しているCloud ComposerというApache Airflow で構築されたフルマネージドのサービスを利用しています。その中で、GitHubが提供しているGitHub Actionsを使ってCI/CDパイプラインを構築しました。
CI(プルリクを提出する際)
- Apache AirflowのPythonスクリプトをlinter (flake8)でチェックする
- Terraform周りのコマンドを実行する (
terraform validate,terraform plan,tflint) - リソースの差分を分かりやすくするために、
terraform validate,terraform plan,tflintのステータスとterraform planのログをPRのConversationで表示できるようにする
CD(リリースする際)
- GitHubのGUIからタグ付けによるリリース
terraform applyを実行- Cloud Composerへのデプロイを実行
- リリース消しによるロールバック
それでは詳細について紹介していきます。
CI
認証
2021年末、AWSとGCPはGitHub Actionsからリソースを操作する際に、OpenID Connect認証を推奨し始めました。 このアップデートとともに設定する手間が少し増えましたが、secrets keyなどのセンシティブな情報をGitHubのSettingsに長期的に保存する必要がなくなったので、セキュリティがより強化されます。
AWSではGitHub Actions用のIAMロールを予め作成しaws_assume_role_arnを取得する必要があります。また、本データ基盤ではディレクトリによってステージング・本番環境の設定を分けているため、Github Actionsのmatrix機能でステージング・本番環境それぞれのCIを同時実行します。
AWSのOpenID Connect認証
strategy:
  matrix:
    dir:
      - 'terraform/data-infrastructure-aws/stg'
      - 'terraform/data-infrastructure-aws/prod'
  fail-fast: true

defaults:
  run:
    shell: bash
    working-directory: ${{ matrix.dir }}

steps:
  - name: Check out source repository
    uses: actions/checkout@v2

  - name: Resolve AWS credentials
    id: credentials
    run: |
      if [[ "$(basename $(pwd))" == "stg" ]]; then
        echo "::set-output name=aws_assume_role_arn::${{ secrets.AWS_ROLE_ARN_STG }}"
      elif [[ "$(basename $(pwd))" == "prod" ]]; then
        echo "::set-output name=aws_assume_role_arn::${{ secrets.AWS_ROLE_ARN_PROD }}"
      else
        echo "::set-output name=aws_assume_role_arn::UNKNOWN"
      fi

  - id: 'auth'
    uses: aws-actions/configure-aws-credentials@v1
    with:
      role-to-assume: ${{ steps.credentials.outputs.aws_assume_role_arn }}
      aws-region: ap-northeast-1

  - name: Get caller ID
    run: aws sts get-caller-identity
GCPでは事前にservice_accountを作成し、workload_identity_providerを追加する必要があります。
GCPのOpenID Connect認証
# ...

- id: 'auth'
  name: 'Authenticate to Google Cloud'
  uses: 'google-github-actions/auth@v0'
  with:
    workload_identity_provider: '${{ steps.credentials.outputs.workload_identity_provider }}'
    service_account: '${{ steps.credentials.outputs.service_account }}'
Terraform
認証周りの設定が完了したら、terraform validate、terraform planとtflintを実行するステップを作成します。tflintは事前にターゲットディレクトリの下に、providerのバージョン、モジュールを検証するか、宣言したが使われていない変数があるかなどが含まれている設定ファイル.tflint.hclを追加しておく必要があります。
plugin "aws" {
    enabled = true
    version = "0.13.3"
    source  = "github.com/terraform-linters/tflint-ruleset-aws"
}

config {
    module = true
}

rule "terraform_required_version" {
  enabled = true
}

rule "terraform_unused_declarations" {
  enabled = true
}

rule "terraform_unused_required_providers" {
  enabled = true
}
書き方はtflintの公式ドキュメントにあります。
ただし、現時点(2022年5月5日)ではtflintはmoduleに渡している変数関連のリソースしか検証できなく、それ以外のリソースは検証できないので、ご注意ください。
Issues must be associated with a variable that was passed to the module. If an issue within a child module is detected in an expression that does not reference a variable (var), it will be discarded.
https://github.com/terraform-linters/tflint/blob/master/docs/user-guide/module-inspection.mdgithub.com
Terraformのステップを追加するとGCPのパイプラインは下記のようになりました。(AWSは認証のところ以外は同じになっているため説明を割愛します)
name: terraform CI AWS

on:
  pull_request:
    paths:
      - 'terraform/data-infrastructure-aws/**'
      - '.github/workflows/terraform-ci-aws.yml'

jobs:
  terraform-ci:
    runs-on: ubuntu-latest
    timeout-minutes: 5

    permissions:
      contents: write
      id-token: write
      issues: write
      pull-requests: write

    strategy:
      matrix:
        dir:
          - 'terraform/data-infrastructure-aws/stg'
          - 'terraform/data-infrastructure-aws/prod'
      fail-fast: true

    defaults:
      run:
        shell: bash
        working-directory: ${{ matrix.dir }}

    steps:
      - name: Check out source repository
        uses: actions/checkout@v2

      - name: Resolve AWS credentials
        id: credentials
        run: |
          if [[ "$(basename $(pwd))" == "stg" ]]; then
            echo "::set-output name=aws_assume_role_arn::${{ secrets.AWS_ROLE_ARN_STG }}"
          elif [[ "$(basename $(pwd))" == "prod" ]]; then
            echo "::set-output name=aws_assume_role_arn::${{ secrets.AWS_ROLE_ARN_PROD }}"
          else
            echo "::set-output name=aws_assume_role_arn::UNKNOWN"
          fi

      - id: 'auth'
        uses: aws-actions/configure-aws-credentials@v1
        with:
          role-to-assume: ${{ steps.credentials.outputs.aws_assume_role_arn }}
          aws-region: ap-northeast-1

      - name: Get caller ID
        run: aws sts get-caller-identity

      - name: Setup terraform
        uses: hashicorp/setup-terraform@v2
        with:
          terraform_version: 1.1.2

      - name: Setup tflint
        uses: terraform-linters/setup-tflint@v1
        with:
          tflint_version: latest

      - name: Format terraform
        id: fmt
        run: terraform fmt --recursive -diff
        continue-on-error: true

      - name: Init terraform
        id: init
        run: terraform init

      - name: Init tflint
        run: tflint --init

      - name: Run tflint
        id: tflint
        run: tflint --config .tflint.hcl

      - name: Valiate terraform
        id: validate
        run: terraform validate -no-color

      - name: Plan terraform
        id: plan
        run: terraform plan -no-color -detailed-exitcode
        continue-on-error: true
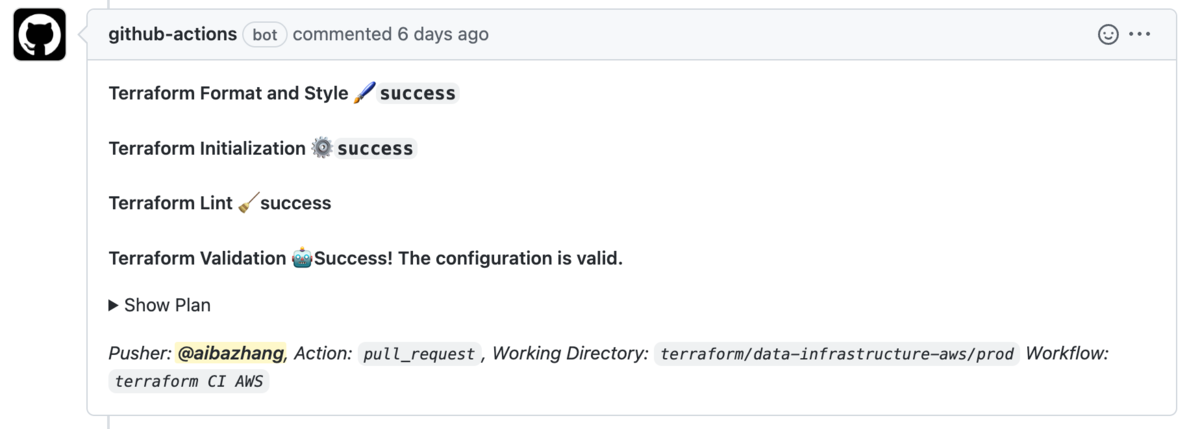
毎回GitHub Actionsのログからterraform planの結果を確認するのは手間がかかるので、リソースの差分を分かりやすくするために、terraform validate, terraform plan, tflintのステータスとterraform planのログを自動的にPRのConversationで表示できるようにします。
ここではアクションgithub-script@0.9.0を利用します。
- 前のステップの
steps.{id}.outcomeあるいはsteps.{id}.outputs.stdoutからterraform validate,terraform plan,tflintのステータスを取得します。 - リソースの差分情報を一旦中間環境変数
PLANとして保存し、スクリプトにて利用されます。 github.issues.createCommentでPRのConversationに自動的にコメントを追加します。
- uses: actions/github-script@0.9.0
  if: ${{ matrix.dir == 'terraform/data-infrastructure-gcp/prod' }}
  env:
    PLAN: "terraform\n${{ steps.plan.outputs.stdout }}"
  with:
    github-token: ${{ secrets.GITHUB_TOKEN }}
    script: |
      const output = `#### Terraform Format and Style 🖌\`${{ steps.fmt.outcome }}\`
      #### Terraform Initialization ⚙️\`${{ steps.init.outcome }}\`
      #### Terraform Lint 🧹\`${{ steps.tflint.outcome }}\`
      #### Terraform Validation 🤖${{ steps.validate.outputs.stdout }}

      <details><summary>Show Plan</summary>

      \`\`\`${process.env.PLAN}\`\`\`

      </details>

      *Pusher: @${{ github.actor }}, Action: \`${{ github.event_name }}\`, Working Directory: \`${{ matrix.dir }}\` Workflow: \`${{ github.workflow }}\`*`;

      github.issues.createComment({
        issue_number: context.issue.number,
        owner: context.repo.owner,
        repo: context.repo.repo,
        body: output
      })
パイプラインが正常終了すると、github-actions(bot)によってコメントが追加されているのを確認できます。
Cloud Composer
PRを提出際に、Cloud Composer (Apache Airflow)のPythonスクリプトをlinter (flake8)でチェックします。
ここではアクションpy-actions/flake8を利用しています。
余談ですが、スクリプトインジェクションによる攻撃を防ぐため、サードパーティーアクションは使用前に必ず実装を確認しましょう。
jobs:
  flake8-lint:
    runs-on: ubuntu-latest
    timeout-minutes: 5
    name: Lint
    steps:
      - name: Check out source repository
        uses: actions/checkout@v2
      - name: Set up Python environment
        uses: actions/setup-python@v2
        with:
          # composer-2.0.1-airflow-2.1.4のPythonバージョンに合わせている
          python-version: "3.8"
      - name: flake8 Lint
        uses: py-actions/flake8@v2
        with:
          max-line-length: "120"
          path: "workflows"
ただし、ETLクエリはどうしても長くなることがあるので、E501 line too longを無視するために当該クエリの行の最後に# NOQA E501を追加すると良いでしょう。
CD
新しくリソースを追加したり、Apache AirflowのPythonスクリプトを更新したりしてPRがmainブランチにマージされたら、次は変更を本番環境に反映(リリース)します。
リリース
GitHubのGUIからmainブランチにタグ付けてリリースしたら、パイプラインが発火されます。
on:
  release:
    types: published
    branches:
      - 'main'
terraform validate, terraform plan, tflintはすでにPRを出す際にチェックされていたため、初期化するコマンドterraform initと変更を反映するコマンドterraform applyのみを実行します。
- name: Init terraform
        id: init
        run: terraform init

- name: Apply terraform
  id: apply
  run: terraform apply -auto-approve
また、Apache AirflowのPythonスクリプトをデプロイするのに、gcloudを使う必要があるので、アクションsetup-gcloudを事前に追加します。(認証ステップの後ろでなければいけない)
- name: 'Setup gcloud'
   uses: 'google-github-actions/setup-gcloud@v0'
./workflows/dagsというディレクトリの下にETL処理のワークフローが保存されているので、./workflows/dagsの下にある(__pycache__以外の)全てのディレクトリをgcloudでCloud Composerにインポートします。
- name: Deply DAGs
  id: dags
  working-directory: workflows
  run: |
    find "./dags" -maxdepth 1 -mindepth 1 -type d -not -name "__pycache__" | xargs -I{} \
      gcloud composer environments storage dags import \
        --environment example-workflows \
        --location asia-northeast1 \
        --source {}
ロールバック
自動リリースだけでなく、自動ロールバックもできるとさらに作業の効率化に繋がります。 以下のシナリオが想定されます。
v0.0.11をリリースしてしまった- AWS/GCPを確認し、問題があると気づいた
- チームメンバーと相談した上、安定に動作している一個前のv0.0.7にロールバックにすることを決めた
この時点のローカルリポジトリ、リモートリポジトリ、AWS/GCPのバージョンは下記になっています。

GitHubのGUIからv0.0.11のリリースを消すとCDパイプラインが発火されて、その時点に最新のタグ(つまり、一つ前のタグv0.0.7)がリリースされます。

ポイントは2つあります。
- リリースを消すとCDパイプラインを発火させる
- 前のバージョンをfetchして再度リリース
具体的にどのようにして実装するのを見ていきましょう。
リリースを消すとCDパイプラインを発火させる
typesにdeletedを追加するだけ実現可能です。
on:
  release:
    types: [published, deleted]
    branches:
      - 'main'
前のバージョンをfetchして再度リリース
アクションfetch-latest-releaseを利用して最新バージョンをfetchします。問題のあるリリースはすでに消されたため、一つ前のタグが最新バージョンになります。また、リリースする際にもこのロジックが通用するため、新しくロールバック専用のパイプラインを作成する必要がありません。
steps:
  - id: latest
    uses: thebritican/fetch-latest-release@v1.0.3
    with:
      github_token: ${{ github.token }}
最終的にワークフローは下記の通りになりました。
name: terraform CD GCP

on:
  release:
    # Rollback when tag is removed
    types: [published, deleted]
    branches:
      - 'main'

jobs:
  terraform-cd:
    runs-on: ubuntu-latest
    timeout-minutes: 15

    permissions:
      contents: write
      id-token: write

    defaults:
      run:
        shell: bash
        working-directory: 'terraform/data-infrastructure-gcp/prod'

    steps:
      - id: latest
        uses: thebritican/fetch-latest-release@v1.0.3
        with:
          github_token: ${{ github.token }}

      - name: Check out source repository
        uses: actions/checkout@v2
        with:
          ref: ${{ steps.latest.outputs.tag_name }}

      - id: 'auth'
        name: 'Authenticate to Google Cloud'
        uses: 'google-github-actions/auth@v0'
        with:
          workload_identity_provider: '${{secrets.GCP_WORKLOAD_IDENTITY_PROVIDER_PROD }}'
          service_account: '${{ secrets.GCP_SERVICE_ACCOUNT_PROD }}'

      - name: 'Setup gcloud'
        uses: 'google-github-actions/setup-gcloud@v0'

      - name: Setup terraform
        uses: hashicorp/setup-terraform@v2
        with:
          terraform_version: 1.1.2

      - name: Init terraform
        id: init
        run: terraform init

      - name: Apply terraform
        id: apply
        run: terraform apply -auto-approve

      - name: Deply DAGs
        id: dags
        working-directory: workflows
        run: |
          find "./dags" -maxdepth 1 -mindepth 1 -type d -not -name "__pycache__" | xargs -I{} \
            gcloud composer environments storage dags import \
              --environment example-workflows \
              --location asia-northeast1 \
              --source {}
(AWSは認証とワークフローのデプロイ以外は同じになっているため説明を割愛します)
おわりに
- データ基盤におけるGitHub Actionsを使ったTerraformとCloud ComposerのCI/CDを構築しました。
- プルリクを提出する際、Pythonスクリプトをlinter (flake8)でチェックし、Terraformのコードを
terraform validateとtflintで自動検証を行います。 - Terraformのステータスとリソースの差分のログを自動的にPRのConversationで表示できるようにします。
- タグ付け時に
terraform applyとCloud Composerへのデプロイを自動実行します。 - 不備があると気づいた際に、リリースを消すことで自動ロールバックを行うことが可能です。
以上、最後まで読んでいただきありがとうございました。
Architectグループでは一緒に働く仲間を募集しています。