技術本部 R&D研究員の前嶋です。梅雨の季節ですが、少しでも快適に過ごせるようにOnのCloud 5 wpを購入しました。水に強くて軽快な履き心地で最高ですね。(追記:この記事の公開作業をしている間に梅雨が終わってしまいました)
今回は、データフレームのテストについての記事です。
データフレームのテストをどう書くか
データが中心となるサービスのネックになるのが テストをどう書くか です。というのも、データフレームは行×列の構造になっているため、入力あるいは出力値がデータフレームになるような関数が多いプログラムでは、テストケースを書くのが非常に面倒です。仕様の変更があった場合、それぞれのテスト用の疑似データに修正を加えることを考えると、より簡潔にデータフレームのバリデーションをする方法が欲しいところです。実は、データフレームのテストはProperty Based Testingという考え方と非常に相性が良いです。今回の記事では、pandera と hypothesis ライブラリを活用した、データフレームに対するProperty Based Testingの方法を紹介します。
Property Based Testing(PBT)
Property Based Testing(PBT) は、Haskellの QuickCheck で導入された概念だと言われています。一般的なExample Based Testing、つまり、ある値を入力したときの出力値(と状態)を検証するテストとは異なり、Property Based Testingは、入力値あるいは出力値が特定の属性(property)を満たしているかを検証します。例えば、自然数を整数倍する関数があったときに、その出力値は整数という属性を満たしている必要がありますが、入力値でさまざまなパターンで試してみて、結果が整数にならない場合はその例を返します。 契約による設計(Design by Contract, DbC)を実現するテスト手法として、名著『達人プログラマー』でも推奨されています。
今回使用した環境
>>> import session_info
>>> session_info.show(jupyter=None,html=False)
-----
hypothesis          6.47.2
ipytest             NA
pandas              1.4.2
pandera             0.11.0
session_info        1.0.0
-----
IPython             8.4.0
jupyter_client      7.3.4
jupyter_core        4.10.0
-----
Python 3.9.6 (default, Dec 23 2021, 15:12:20) [GCC 9.3.0]
Linux-5.13.0-1017-aws-x86_64-with-glibc2.31
-----
Session information updated at 2022-06-15 18:46
hypothesisによるPBT
hypothesis は、PythonでPBTを行うためのライブラリです。
import hypothesis
from hypothesis import strategies as st
hypothesisを使ったユニットテストの例
テストケースを生成する戦略(strategy)を定義します。例えば st.integers() はint型から生成を行い、 st.text() は文字列からの生成を行います。example() メソッドを使うと、戦略に沿って具体的な例を1つ生成します。
>>> st.integers().example()
110
>>> st.text().example()
'\U000e5ff5Ñ\U000a8474Ò'
いくつか同時に例を生成してみます。
>>> [st.integers().example() for i in range(10)]
[-26037, 113, -24450, -53, 12869, 4049, -51, -1, -74, -22196]
>>> [st.text().example() for i in range(10)]
['\U00050a03',
 'º',
 '\x00y´k\x00©\x1d\U000ecfecK\nÃ',
 '=#\x04v~\x01',
 '\U0003f49aÿGX\U0005ac1eA\nØÂo]\U0010fc83\U0005b826\x15\x98æî\x03\U000a7d7d\\\x16',
 'ó',
 '<',
 '',
 "\x96ºÛ\U000c1843Ú\x05iS\U000b7930°\x95ÇmDÛE淟\x9c\x85'",
 '퇦\x88Z~']
大小さまざまな値が生成されていることが確認できます。
ここから実際にテストをしていきます。例として、整数型の入力値を2乗する関数を作ってみます。
def square_int(num: int) -> int:
    return num**2
特定の戦略に沿ってテストケースを生成する、ということを指示するためには、テスト用の関数に @hypothesis.given デコレータを付与します。今回はテストフレームワークにpytestを、ipytest経由で使っています。
%%ipytest
@hypothesis.given(st.integers()) #from hypothesis import givenすると@givenだけで十分です
def test_square_int(num):
    assert type(square_int(num)) == int

test_square_int()
実行結果
.                                                                                            [100%]
1 passed in 0.08s
この場合、テストは正常に終了します。次に、失敗する例を見てみましょう。整数型のxを整数型のyで除算する関数を作ってみます。
def divide_int(dividend: int, divisor: int) -> float:
    return dividend/divisor
%%ipytest
@hypothesis.given(st.integers(),st.integers())
def test_divide_int(m,n):
    assert type(divide_int(m,n)) == float

test_divide_int()
実行結果
============================================= FAILURES =============================================
_________________________________________ test_divide_int __________________________________________

    @hypothesis.given(st.integers(),st.integers())
>   def test_divide_int(m,n):

/tmp/ipykernel_1884269/3865937179.py:2:
_ _ _ _ _ _ _ _ _ _ _ _ _ _ _ _ _ _ _ _ _ _ _ _ _ _ _ _ _ _ _ _ _ _ _ _ _ _ _ _ _ _ _ _ _ _ _ _ _ _
/tmp/ipykernel_1884269/3865937179.py:3: in test_divide_int
    assert type(divide_int(m,n)) == float
_ _ _ _ _ _ _ _ _ _ _ _ _ _ _ _ _ _ _ _ _ _ _ _ _ _ _ _ _ _ _ _ _ _ _ _ _ _ _ _ _ _ _ _ _ _ _ _ _ _

dividend = 0, dividor = 0

    def divide_int(dividend: int, dividor: int) -> float:
>       return dividend/dividor
E       ZeroDivisionError: division by zero

/tmp/ipykernel_1884269/3209391611.py:2: ZeroDivisionError
-------------------------------------------- Hypothesis --------------------------------------------
Falsifying example: test_divide_int(
    m=0, n=0,
)
===================================== short test summary info ======================================
FAILED tmpqcwyph70.py::test_divide_int - ZeroDivisionError: division by zero
1 failed in 0.05s
このテストは通りません。
-------------------------------------------- Hypothesis --------------------------------------------
Falsifying example: test_divide_int(
    m=0, n=0,
)
が示すように、m=0,n=0 の時にゼロ除算エラーが起きていることがわかります。このように、hypothesisが生成したエラーから、テストを通らないケースを示してくれます。この結果から、関数の中の処理を追加したり、入力値にバリデーションを加えたりすることが考えられます。 なお、入力値に対して特定の制約を課すことができます。以下の例では、それぞれの入力値の最小値を1に設定します。当然ですが、このような制約を加えた場合、テストは通ります。
%%ipytest
@hypothesis.given(st.integers(min_value=1),st.integers(min_value=1))
def test_divide_int(m,n):
    assert type(divide_int(m,n)) == float

test_divide_int()
.                                                                                            [100%]
1 passed in 0.11s
次に、データフレームに対して、hypothesisを用いたPBTを適用していきます。その前に、panderaを使ってDataFrameのスキーマを作る必要があります。
panderaでDataFrameのスキーマを定義する
panderaはpandasオブジェクトのバリデーションツールです。
import pandas as pd
import pandera as pa
from pandera.typing import Series
panderaによってデータフレームのスキーマを定義することで、想定されていないデータフレームの構造や要素を検知することができます。例えば、スキーマに定義された列がない時、あるいは列要素の型が違うときにエラーを返してくれます。
データフレームのスキーマは、以下のように定義することができます(他にも記法はありますが省略)。nullable=False によって、列の要素がnullになることを許容しないという制約をかけることができます。
class UserProfileDataSchema(pa.SchemaModel):
    user_id: Series[str] = pa.Field(nullable=False)
    full_name: Series[str] = pa.Field(nullable=False)
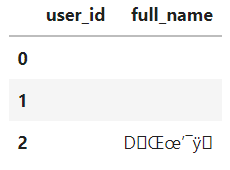
example() メソッドを使って、行の長さ(size) が3の例を生成してみます。
UserProfileDataSchema.example(size=3)

あまり現実的ではない文字列で構成されたデータフレームができてしまいました。もう少し制約を加えてみることにします。panderaのスキーマでは、nullable 以外にもさまざまな制約をかけることができます。UserProfileDataSchema にいろいろと制約をかけてみましょう。他にもさまざまな制約があるので、気になる方は公式のドキュメント)を参照してください。
class UserProfileDataSchema(pa.SchemaModel):
    user_id: Series[str] = pa.Field(
        nullable=False,
        unique=True, #ユニーク制約
        str_matches="[0-9]+", #文字列の規則を定義する正規表現
        str_length={"min_value":1,"max_value":5} #文字列の長さの範囲
    )
    full_name: Series[str] = pa.Field(
        nullable=False,
        str_matches="[a-z]+",
        str_length={"min_value":1,"max_value":20}
    )
    member_grade: Series[str] = pa.Field(
        nullable=False,
        isin=["novice","premium","super_premium"] #文字列の集合
    )
    badge_count: Series[int] = pa.Field(
        nullable=False,
        ge=0, #特定の値以上
        le=100 #特定の値以下
    )

UserProfileDataSchema.example(size=3)

既存のスキーマとの重複がある場合は、それらを継承して、新たなスキーマを追加したり、既存のスキーマを書き換えることができます。ここでは、タイムゾーン情報がついた時間を表す型 pd.DateTimeTZD を追加しています。この型を使用するためには typing_extentions モジュールから Annotated クラスをインポートする必要があります。
from typing_extensions import Annotated

# UserProfileDataSchemaを継承してpd.DatetimeTZDtype型の列participation_datetimeを追加
class UserProfileDataWithDatetimeSchema(UserProfileDataSchema):
    participation_datetime: Series[Annotated[pd.DatetimeTZDtype, "ns", "Asia/Tokyo"]] = pa.Field(nullable=False)

UserProfileDataWithDatetimeSchema.example(size=3)

この例では、先ほど追加した列のタイムゾーンをUTCに書き換えています。participation_datetime がかなりエッジケースを攻めていますね。続いて、スキーマを継承して列の定義を書き換える例です。
# UserProfileDataWithDatetimeSchemaを継承してpartiripation_datetimeのtimezoneをUTCに書き換える
class UserProfileDataDatetimeUTCSchema(UserProfileDataWithDatetimeSchema):
    participation_datetime: Series[Annotated[pd.DatetimeTZDtype, "ns", "UTC"]] = pa.Field(nullable=False)

UserProfileDataDatetimeUTCSchema.example(size=3)

関数の入出力にスキーマ検証を仕込む
さて、ついにデータフレームに対してPBTを適用していきます。panderaにはhypothesis用のプラグインが用意されており、そちらを利用します。関数の入出力にDataFrameSchemaによる型ヒント DataFrame[HogeSchema] を定義し、@pa.check_types デコレータを付与すると、入出力値のバリデーションを行ってくれます。
データサイエンティストの方はデータクリーニングを主にパイプライン処理を書くことが多いかと思いますが、その場合、ある処理の出力値は別の処理の入力値として使われることが前提のため、各関数のOutSchemaだけを検証すればよいかと思います。
from pandera.typing import DataFrame

@pa.check_types
def sort_by_badge_count(df: DataFrame[UserProfileDataSchema]) -> DataFrame[UserProfileDataSchema]:
    return (df
        .sort_values("badge_count")
        .reset_index())
テストの際は strategy() メソッドを用いて、引数 size で生成するデータフレームの行数を指定します。なお、今回は制約の数が多く、テストケースの生成に時間がかかるため、ヘルスチェックを一部オフにしています。
%%ipytest

from hypothesis import HealthCheck, settings

@settings(suppress_health_check=(
    HealthCheck.large_base_example,
    HealthCheck.too_slow,
    HealthCheck.filter_too_much)
)
@hypothesis.given(UserProfileDataSchema.strategy(size=3))
def test_sort_by_badge_count(df):
    sort_by_badge_count(df)
実行結果
.                                                                                            [100%]
1 passed in 10.84s
UserProfileDataSchema の制約を厳しくしてみましょう。具体的には、スキーマで定義された列以外があるときにエラーを返すようにします。データフレーム全体に適用されるような制約は、スキーマの中で config クラスを定義することで付与できます。strict=True は、定義された列のみを正しいと見なす制約です。
class StrictUserProfileDataSchema(UserProfileDataSchema):

    class Config:
        strict = True
%%ipytest

@pa.check_types
def sort_by_badge_count(df: DataFrame[StrictUserProfileDataSchema]) -> DataFrame[StrictUserProfileDataSchema]:
    return (df
        .sort_values("badge_count")
        .reset_index())

@settings(suppress_health_check=(
    HealthCheck.large_base_example,
    HealthCheck.too_slow,
    HealthCheck.filter_too_much)
)
@hypothesis.given(StrictUserProfileDataSchema.strategy(size=3))
def test_sort_by_badge_count(df):
    sort_by_badge_count(df)
実行結果(前略)
E       pandera.errors.SchemaError: error in check_types decorator of function 'sort_by_badge_count': column 'index' not in DataFrameSchema {'user_id': <Schema Column(name=user_id, type=DataType(str))>, 'full_name': <Schema Column(name=full_name, type=DataType(str))>, 'member_grade': <Schema Column(name=member_grade, type=DataType(str))>, 'badge_count': <Schema Column(name=badge_count, type=DataType(int64))>}

.venv/lib/python3.9/site-packages/pandera/decorators.py:94: SchemaError
-------------------------------------------- Hypothesis --------------------------------------------
Falsifying example: test_sort_by_badge_count(
    df=
          user_id full_name member_grade  badge_count
        0       0         a       novice            0
        1       1         a       novice            0
        2       2         a       novice            0
    ,
)
===================================== short test summary info ======================================
FAILED tmpxu6tpm0p.py::test_sort_by_badge_count - pandera.errors.SchemaError: error in check_type...
1 failed in 2.60s
エラーになります。エラーメッセージには column 'index' not in DataFrameSchema とあるので reset_index() 時に追加された index 列のせいでスキーマエラーが出ていることが原因です。今度は reset_index() の引数に drop=True を指定して、index 列が発生しないようにしてみます。
%%ipytest
@pa.check_types
def sort_by_badge_count(df: DataFrame[UserProfileDataSchema]) -> DataFrame[UserProfileDataSchema]:
    return (df
        .sort_values("badge_count")
        .reset_index(drop=True))

@settings(suppress_health_check=(
    HealthCheck.large_base_example,
    HealthCheck.too_slow,
    HealthCheck.filter_too_much)
)
@hypothesis.given(StrictUserProfileDataSchema.strategy(size=3))
def test_sort_by_badge_count(df):
    sort_by_badge_count(df)
実行結果
.                                                                                            [100%]
1 passed in 10.96s
無事にテストが通ります。
今回の記事では、hypothesisとpanderaを用いたデータフレームに対するテストとバリデーションの手法を紹介しました。とは言え、ロジック自体の検証ができるわけではないことや、データの生成に時間がかかることには注意が必要です。これらのツールをどこまでの範囲で使うかは議論の分かれるところだと思いますが、人間の想定していないエッジケースを探すという用途ではかなり有用だと感じました。
